


Most of the times I like to use image references while I’m working in ZBrush and in other 3D software in general. Sometimes to provide inspiration, when this is the case I have a couple of decent screens for my computer at home, so whenever I’m working on something I usually have ZBrush on one screen and a bunch of reference images on the other.
But sometimes I need dose references as blueprints, placing them over the model so the scale and proportions can be modeled more accurately.
In this quick guide, I’ll walk you through the workflow I use to work with references within ZBrush. I will cover the Spotlight feature, which is generaly used as a texturing tool and a references, and integrate it with Timeline. As such, in this guide I will focus on an additional workflow that can provide a new way to look at this tools.
How to Import the Reference Images
Spotlight can be used to keep any number of reference images on screen while you sculpt or paint. You can simply position the images around your work area, or you can work with them with transparency so you can align the model and image while you work.

First, you will want to import the reference images inside ZBrush. To do so just push the "Import" button located inside the Texture menu and chose a single image.
Now you should see a thumbnail of the image you have chosen in the Texture palette. Select it and push "Add to Spotlight".
Positioning the References on the Viewport
You can change the position of the image by holding the mouse Left-Click on the space inside the wheel, place it exactly where you want. You can also scale it to the appropriate size using the Spotlight wheel’s tools to set things like scale and opacity.

You can use Shift + Z on your keyboard to show or hide all Spotlight images. Once Spotlight is shown you can press Z again to show or hide the Spotlight settings wheel. When you’re done hide the Spotlight wheel to start sculpting.
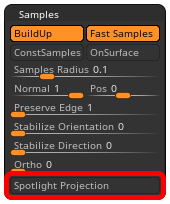
To make sure your tools works properly, you have to turn Spotlight Projection off.
- Navigate to Brush > Samples
- Click on the Spotlight Projection button to turn it off
Reuse Your Spotlight Configuration
After a long time configuring your reference images on its place, you can accidently discover that if you close and re-open your project, you will not find any of the images you had previously setup in Spotlight. In other words, saving a ZBrush project file does not automatically save the Spotlight configuration. To avoid this, you have to save the Spotlight configuration.
- Navigate to Texture
- Push on Save Spotlight button
TIP: This can be useful to move your spotlight configuration between projects. To load it again you have to:
- Navigate to Texture
- Push on Load Spotlight button
Working in the Timeline
For instance, what happens when you want to build your work based on a blueprint. Or which would come to be the same, you want to adjust the scene viewport in certain angle to fit with one reference, and then take an other angle of the model and make it fit to an other reference.
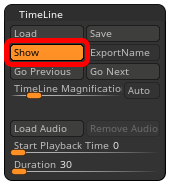
Now you will want to show the timeline panel as it is turend of by default.
- Navigate to Movie > Timeline
- Push the Show button
At this time I recomend you to turn off the Perspective, since it will be easier for you to move your viewport in order to align your mesh with the appropriate image.

Once you have your model on the right place, now you can save your scene viewport position by clicking anywhere on the timeline, this will create a keyframe storing the actual view position with it. Repeat this process for every reference image you have.
To easely switch between keyfremes use the Left and Right arrow keys. Otherwise if you want to remove a keyframe, just drag and drop outside the timeline.
In Conclusion
References are very important when developing a concept or modelling a likeness. In fact, modeling acurately to a 2D reference images is a valued skill in the VFX industry.
Beside the Spotlight, ZBrush has other cool and powerful modes of image referencing including: the See-Through Mode which allows you to see the desktop and other windows through the ZBrush window, the Grids option which allows you to set up front and back images along a Grid plane and the Image Plane which provides a set of reference Views to match model positions exactly to background images.
I also attach a video from Danny Mac which will help you to complement the understanding of this process.
That’s it for this guide, I hope you find this tips interesting and somehow useful. Let me know what you think in the comments below and thanks for sharing!


